Saturday, December 24, 2011

Christmas Crafts

I made a few new crafts to add to my Christmas decorations.  I made this with picture frames from the dollar store. I then found some scrapbook paper that I liked, cut it to fit the frames & Cut the letters out on my Silhouette. Cheap, Quick, Simple & cute!

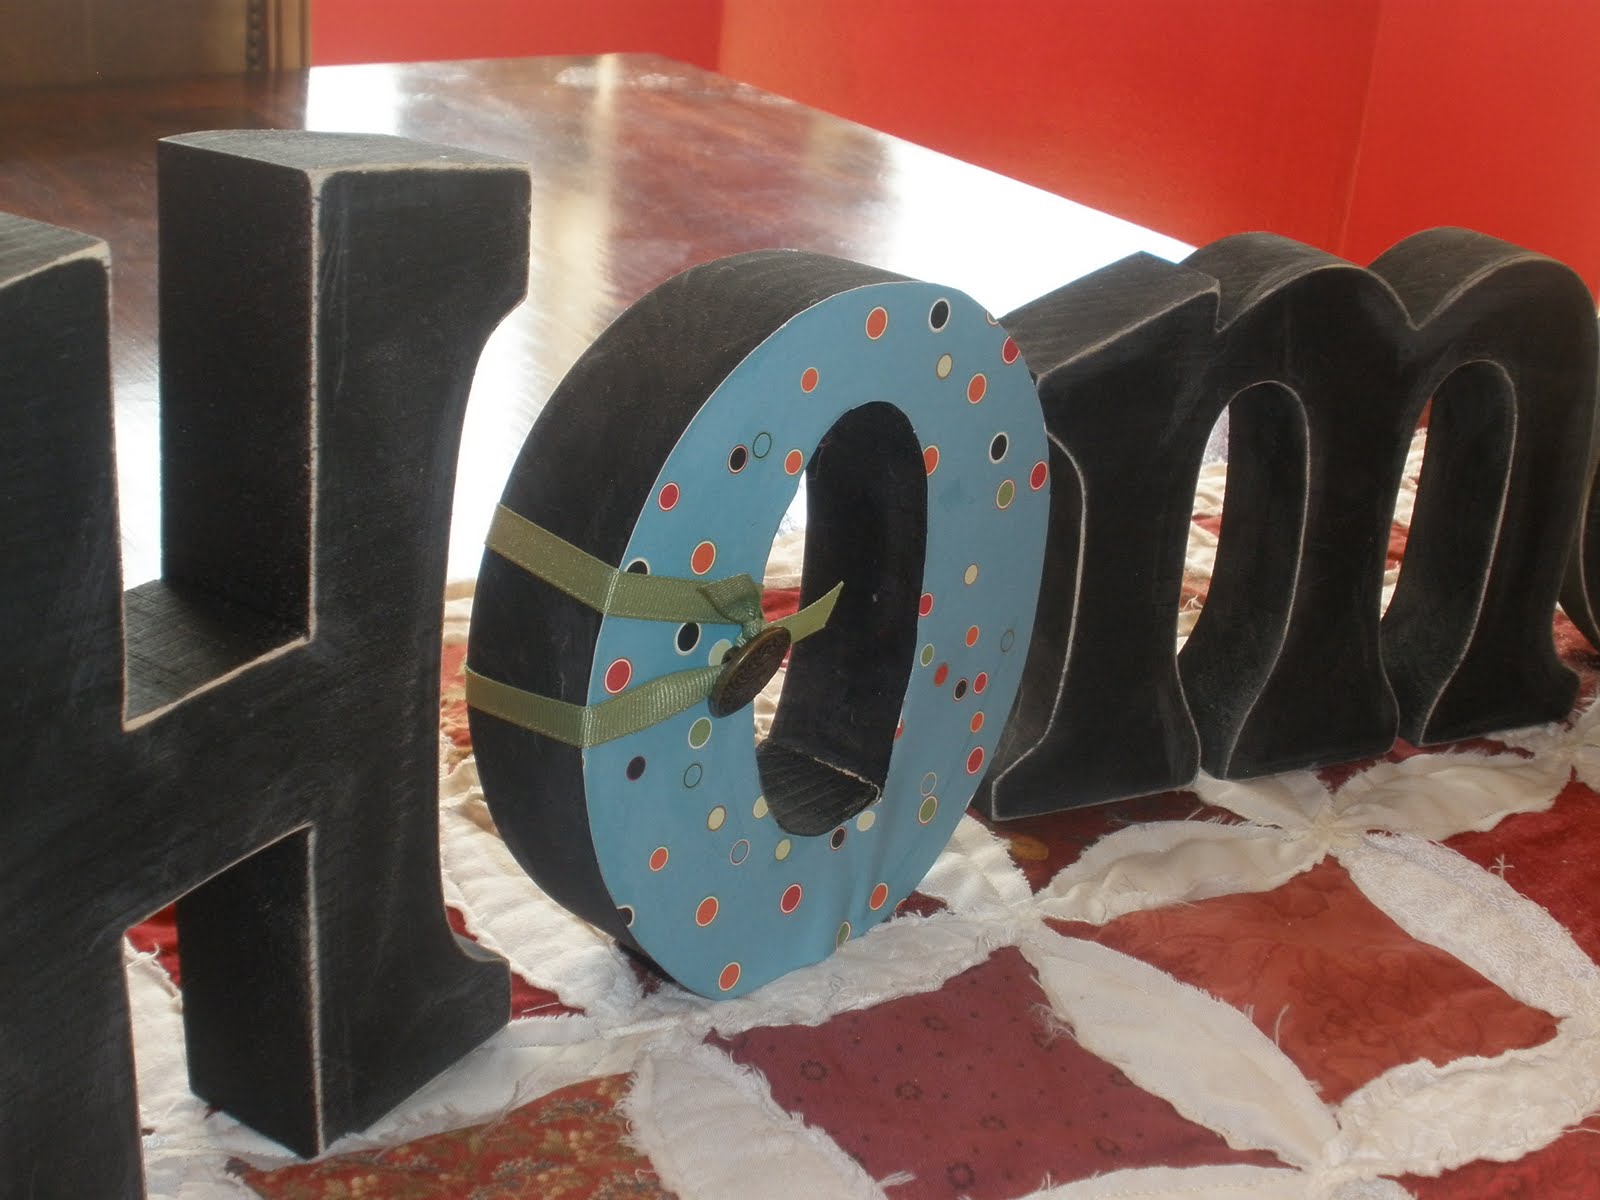
 Next was my JOY blocks!  My husband cut out the blocks for me.  I painted the blocks white, when dried, I sanded the corners.  I then found some scrapbook paper that I liked,  cut it just a bit larger than I wanted and then torn and inked the edges.  I then mod poged the paper to the wood blocks.  I cut the letters with my Silhouette.  Adhered the letters, and added the embellishments (ribbon and buttons as holly).  This was simple.  I already had everything at home, so it really cost me nothing but time.  I made a few of these to give away as gifts, because I was so please with how they turned out!

Sunday, December 11, 2011

Kid Ornament Tradition

Every year, I get a new ornament for the kids.  I write on the bottom of the ornament whos it is, and the year.  My sister has done this with her girls, and it is fun to see and all the different things they are into over the years.  K is really into Cars this year, so he got a Mater & McQueen ornament.  C is still to small to pick her own, so I have picked hers.


Ornaments Collection

When I go on vacations, I really want to bring something home, but T-shirts & all the other souvenir crap always goes to the way side.  I decided a while back, that I should start collecting Christmas ornaments from the places I go!  (or places my family goes and I don't get to go, but they kindly bring me an ornament)! Here are a few of my ornaments.....
Mickey Mouse
New York
London
Stone Mountain, Georgia


Tuesday, August 30, 2011

Something for the HOME!

I have been wanted to make a "HOME" for house! I wish I had a saw that I could cut everything that I want, but alas I don't.  I found these letter at Roberts for $13.99!  I really liked how chunky they were, so I bought them!  A very easy project.  I painted them BLACK with the help of my 4 year old.  I Mod Podged paper to the "O"  & added some ribbon and a button for an embellishment, and finally I sanded the edges.  I am very please with how it turned out! 


Tuesday, August 9, 2011

Lima Bean Wreath

I had a friend tell me about Lima bean wreaths and how she saw them on a blog.  I made several of them, but could never find the blog that she was referring to, but I have found it, and can now give credit where it is do.  !  Thanks southernlovely !! 

Here is what you need....
foam wreath
Lima beans
Hot Glue
Spray Paint

Glue beans to wreath however you like.  Spray paint! TA-DA SUPER CUTE and SUPER EASY to make. I found foam wreaths at the dollar store (I bought 10) and had everything else at home.  I made 2 of them in white for C's room!  I also made one in red which was by far my favorite!

Yummy Marshmallow Popcorn

If you are trying to loose weight, this isn't the popcorn for you, but it is SO WORTH IT!  My friend Sharma gave me this recipe back in the day, & we LOVE it.  I usually make it in the fall around Halloween, but thought it would be a nice change.
1/2 c. unpopped popcorn
1 cube butter
1/4 c oil
1 lg. bag marshmallows
candy corns
plain or peanut M&Ms

In a sauce pan melt butter.  Add oil.  Mix in marshmallows until melted (like rice krispy treats). Pop the popcorn. (if you don't have a popper, you can use 3 bags of microwave popcorn)  Pour marshmallows over top of popcorn. Add candy corns and M&M's.  I use about 1 cup of each, just depends on how much you want.  (Just a little hit..it helps to have the popcorn still fairly warm when pouring marshmallows on).
My husband likes it the second day.  He says it gives one day to marinate!!

Sunday, July 31, 2011

Lemon Cream Cupcakes


My niece Alyssa made these cupcakes while I visitingI thought they were very worthy of the blog. 

Cupcakes
1 pkg.       Lemon Jello (3 oz. pkg.)
1               White Cake Mix
1 pkg.       Instant Cheesecake pudding & pie filling mix (4 serving size)
1 1/4 C     Lemonade
4               Eggs
1/3 C        Oil
1 t.            Vanilla
Preheat Oven to 350.  Set aside 2 t. Lemon Jello mix for frosting.  In a mixing bowl beat the remaining jello, cake mix, pudding mix, lemonade, eggs, oil, and vanilla.  Spoon batter into muffin tins lined with cupcake papers.  Fill about 2/3's full.  Bake for 18-20 minutes.  Cool! 

Cream Cheese Frosting
1 pkg.        Cream Cheese (8 oz.)
1/2 C.        Butter
2 t.             Vanilla
5 1/2 - 6 C Powder Sugar
Allow Cream Cheese and butter to sit at roomn temperature for 30 minutes.  In a large mixing bowl, mix butter, cream cheese and vanilla until fluffy.  Gradually beat in powder sugar and remaining 2 t Lemon pudding mix.  
Top with Lemon Zest!

Sunday, July 24, 2011

California Bound!

I am on vacation at my sisters house in California.  I am hoping to find some crafts, recipes, and other things to blog about.  See you soon!!

Tuesday, July 19, 2011

Chicken Enchiladas

Chicken for dinner again!!  Tonight it is going to be Chicken Enchiladas.

2 lg chicken breast diced into small pieces
1 small onion diced
1 can RED enchilada sauce
1 can green chilies
Ingredients
1/2 lb cheese
1 c. sour cream
1/2 t. season salt
1/2 t. oregano
1 T. olive oil
Flour Tortillas

Cook  chicken sauce
In a large pan, add olive oil.  Add chicken and onions.  Cook through stirring in season salt & oregano.  Once cooked, add green chilies, sour cream, and about 3/4 of the cheese.  Stir until well blended. Spray baking pan with cooking spray.  Add a SMALL amount of RED enchiladas sauce swishing it around to cover the bottom of dish.  Spoon chicken sauce into tortillas, placing each one in the baking dish.  Repeat until all chicken sauce is used.  Using the rest of the enchilada sauce, cover rolled tortillas. Bake at 350 for 30 - 40 minutes.  Pull out of oven and sprinkle rest of cheese on top.
Add a little RED sauce in bottom
Chicken sauce in tortilla


Add sauce to top
Finished Enchiladas

Saturday, July 16, 2011

Cupcake Birthday Cards

 I LOVE making cards.  It is very therapeutic for me.  I have been making birthday cards lately because that is what I use the most.  I have been on a cupcake theme lately.  This is what I have come up with. 

Tractors!

K my 4 year old  LOVES tractors!  Any color or kind. This is always fun, because we live in a farming community and there are tractors going up and down our street everyday.  I was in ALCO (a VERY small version of Walmart that is near us or as my husband would say, you can buy everything from lingerie to fishing tackle) Surprisingly, they have pretty cute home decor & crafts.  I was checking it out and came across some old tractor prints.  They were marked $49.99. I would never pay that much for them, but I would pay $9.99,  YES $9.99 a piece!!  I bought 2 of them for K's room.  I also bought a tractor calendar that was from last year that was only a dollar.  I came home, hung the prints in his bedroom, and cut out the tractor calendar and hung them up as well.  I really haven't done much else in his room, we did paint in blue and green, I let him pick the colors, but that it about it.  I would like to do more, but he told me to leave it alone, for now at least!


Tuesday, July 12, 2011

Peachy Chicken

We eat a lot of chicken at my house.  I am always looking for new ways to cook chicken.  I usually try a new recipe, and if my kids and husband like it, then I will keep it, if not, we don't cook it again.  One recipe that we LOVE is Peachy Chicken.  My husband will ask me to cook it for dinner about once a week. 

6-8 chicken tenders (thawed) salt & pepppered
2 T. Olive Oil                 
2 T. Butter
1 C. Brown sugar
1 C. Ranch Dressing
2 T Mustard
1 can peaches (15 oz can)


In large skillet, over medium heat add olive oil.  Add chicken, cook until each side golden brown
Remove Chicken from skillet…..Reduce heat, add butter, melt.  Add brown sugar, stirring until smooth.  Add in Ranch dressing & mustard, stir until bubbly.
Return Chicken to pan, add peaches & cook until heated though.
Serve over rice.

Monday, July 11, 2011

Homemade Play Dough

I am always looking for fun things to make with my kids.  I have a cook book that was made by the town I live in, I found a recipe in it for play dough.  It is very easy. 

2 1/2 C flour                   3 T. oil
1/2 C. salt                       2 C. boiling water
1 T. alum

Begin boiling water
Stir flour, salt and alum together in a large bowl.  Add oil and cut oil into flour.  Add water.  Mix with a large spoon until cool enough to knead with hands.
***If you want to make the play dough colored add coloring to water BEFORE you add water to flour mixture. I have split the flour mixture into two bowls and added 1 C. of different colored water to each bowl.

I store the play dough in a ziploc bag.  It will stay good for months, if you keep the bag closed.  The older it gets, it will start to get hard salty spots in it.  I just pull those out and trash them. 

I love this play dough because I KNOW what is in it, and it is super cheap to make. 

Tuesday, July 5, 2011

Sweet Red Chicken in the Crock Pot


I love to cook with a Crock Pot.  I makes life so much easier.  In the summer it is especially nice because you don't have to use to oven or stove top.  This recipe is very simple to make

6 - 10 chicken tenders

Mix together
1 C. Ketchup                        1  lg. squirt mustard
1/3 C. Vinegar                      1/3 C. Soy Sauce
1 C. Sugar                            Garlic Salt  (We like Garlic so I put quite a bit)

Put Frozen chicken tenders in bottom of Crock Pot, pour sauce over top covering all chicken. 
Cook on HIGH for about 4 hours, or LOW for about 6 hours.  I check it every so ofter, and stir it, because the sauce seems to stick to the sides.  About an hour before I am going to serve it, I place pineapple on top of mixture to give that little extra something, plus it makes it look good.

I serve it over rice.
4 YEAR OLD & HUSBAND APPROVED!

Sunday, July 3, 2011

Chocolate Bundt Cake


My Husband LOVES this!  I make it for him instead of a birthday cake!  Plus it is SUPER EASY!!
Preheat over to 350
1 yellow cake mix          1 pkg. (3.9 oz small pkg) chocolate pudding
1 c sour cream                1/2 c water
1/2 c oil                           5 eggs
Mix well, add
1 pkg. chocolate chips (milk or dark which ever you prefer)
Lightly mix.

Spray the heck out of your bundt cake pan with cooking spray.  Pour cake mix into pan.
Bake for 1 hour! 
When I pull it out of the oven, I quickly turn it over onto a cooling rack.  It will come out so much nicer than if you wait for it to cool.  When it has cooled, I move it to a plate, an sprinkle it with powdered sugar. 
It is VERY MOIST, and will stay moist for days as long as you keep something over it.  I have even used a dish cloth, and it still stays moist.  I love to take this to parties, I have never had someone not like it!! 
ENJOY!

Saturday, July 2, 2011

Fireworks!


Super simple made them in about an hour!!  I found some scraps, or rather stole some piece of wood from my husband who was making shelves in the shed. 
Painted them RED, WHITE & BLUE. 
Sanded the edges
Found some cute scrabook paper, bent up corners
Mod podge it to the wood
Wrapped twine around
Cut USA letters out with me Silhoutte
Glued to paper
Stapled peice of yellow rope to top
TA-DA!! 
USA Fireworks for the 4th of July!

Wainscoting Flag!

I have to give my friend Jill some credit for this.   I saw something similar in her house, but I tweaked it a bit.  I found a large piece of wainscoting in our garage.  I cut in down to a size that I like (mine is about 17in x 22in).  Using painters tap, I taped of the white rows first.  Painted them and let them dry a for a while.  I then taped off the red, and painted them.  Finally I taped off the blue.  After everything was dry, I went back and touched up some places.  I was planning on just using paper stars, until I came across these wooden stars I had laying around.  I painted them yellow.  After painting eveything , I destressed it with sand paper, hot glued the stars on , & hot glued a peice of twine to the back to hang it with.  I have it hanging on my front door, but I also have one in my kitchen that I just have sitting on a shelf.

Friday, July 1, 2011

Chocolate Cookie Experiment

We love homemade chocolate cookies at our house.  I have heard that you can replace white beans for shortening.  So I thought I would give it a try in the most beloved cookies in our house. 
Preheat oven to 375
Cookie dough with Shortening
Batch #1
Cream together.
1 c shortening                    3 eggs
1 c white sugar                  1 1/2 t vanilla
1 c brown sugar
Add
3 1/2 c flour                       1 1/2 t baking soda in 1 T water
1 1/2 t salt
Mix together.
1 bag chocolate chips
Mix again!
Scoop out cookie onto a cookie sheet & bake for 8 1/2 minutes
(I have a convection oven so it cooks a little faster than a normal oven)

Batch #2
Cream together.
Cookie dough with beans
1 c White beans        1 T shortening
1 c white sugar         3 eggs           
1 c brown sugar        1 1/2 t vanilla  
Add
4 c flour              1 1/2 t baking soda in 1 T water
1 1/2 t salt
Mix together.
1 bag chocolate chips
Mix again!
Scoop out cookie onto a cookie sheet & bake for 10 minutes 
(I have a convection oven so it cooks a little faster than a normal oven)

Strained beans & rinsed with cold water
Mashed beans with a potato masher added shortening

Cookies on the LEFT are with BEANS!  Cookie on the RIGHT are with SHORTENING
Bean Cookies
Shortening Cookies


After I finished making both batches of cookies, I had cookies coming out of my ears.  I first had my 4 year old try the BEAN cookies.  He ate it and didn't say a thing except can I have another.
 4 YEAR OLD APPROVED!
Next I took some to my neighbor.  They have a teenage boy and girl.  I told the mom which cookies were with BEANS and which ones were without.  I asked her to let me know what her teenagers thought of the cookies and it they could notice a difference. She told me that they didn't get very many because her husband ate most of them, but she did have them try a BEAN cookie and all the said was they thought they were a little moister and chewier.
HUSBAND and TEENAGER APPROVED!

Finally I had my mother in law try them. She told me that she preferred the BEAN cookies over the others. 
MOTHER IN LAW APPROVED!

After 2 days, the BEAN cookies are still moist and taste like I baked them today, whereas the shortening cookies are starting to get a little dry. 

So my experiment has taught me that I will be using WHITE BEANS in place of Shortening, it will be much healthier for the whole family, (in a secret way), and it still taste the same if not better!! 
LIZ & MOTHER APPROVED!

Thursday, June 16, 2011

Fathers Day for Kids

My four year old boy asked me today what he could get daddy for fathers day.  I asked him if her wanted to make  something and of course he did.  I foraged around to try and come up with something that he would enjoy making that wasn't too hard.  I found a couple of scrap pieces of 2x4.  I had him pick out some paint colors, of course he pick green and orange (his favorite).  I had him paint the blocks.  While the paint was drying (forever if you ask him)  he gathered a few things to decorate the blocks with.  We found some pictures, sticks, buttons, and jewels that he liked.  We Mod Podge the pictures to the blocks. He then glued on all of the stuff that he found to decorate with.  I ended up having to Hot glue the sticks on because they wouldn't stick with craft glue.

Summer Letters

I was trying to find something to make a cute "summer" craft.  I happened to come upon letters that were on sale at JoAnns, so I snatched them up.


I wanted it to be bright! I came home went thought ALL of my scrapbook paper.  I traced around each letter, cut them out & adhered them to the letters with Mod Podge. 


Wednesday, June 15, 2011

My blog is new!  I would love to have you advertise on my blog, if you are interest, please contact me at theredkitchenwall@gmail.com

Thank You!
 

Design by Custom Blog Designs